Windows Live Mail is an email client that came with the Windows OS as standard. Now, this software is discontinued, so migrating to Outlook from it is only a matter of time now. Sooner or later you will need to transfer contacts from Windows Live Mail to Outlook and will look for solutions then.
In this article, we are going to cover several simple ways to export contacts from Windows Live Mail and import them to Microsoft Outlook. This step by step guide is pretty much straightforward, so even if you have little experience working with software and do not even know how to export or import things, this guide will teach you to move your contacts to Outlook in a snap.
Table of Contents:
- How to convert multiple Live Mail emails to Outlook automatically?
- Conversion of Live Mail contacts via the single CSV file manually.
- How to convert Live Mail Emails to Outlook?
Features:
- Export Windows Live Mail contacts from any version of the program
- Import contacts from Windows Live Mail to Outlook 2016, 2013, 2010, 2007
- Works if Outlook is installed on the same or on another computer
You can transfer contacts to Outlook via CSV exporting or by saving contacts to a VCF business card file. Below are both ways explained in detail.
How to transfer contacts from Windows Live Mail to Outlook (using VCF export)
To easily migrate to Outlook from Live Mail, you need a quick and efficient way to move Windows Live Mail contacts to Outlook. One such way is to use exporting to the Virtual Contact File format (VCF). We recommend using our Live Mail Contacts Converter utility for effortless conversion. Here is a step-by-step:
Step 1: Export Windows Live Mail contacts to VCF
- Start the Windows Live Mail application

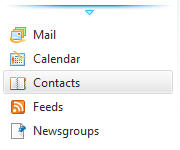
- In the lower-left panel click the Contacts menu. This will open the contacts tab in the central part of the window. (you may press Ctrl+Shift+C to quickly open it)

- Select the contacts you want to export (Press Ctrl+A to select all contacts).

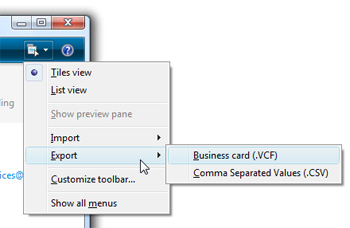
- On the toolbar (ribbon) of WLM select Export. (Alternatively choose menu File > export)
- Select Business Card (VCF) as the output format.
- In the exporting dialog, browse for any suitable folder to save the VCF file to. For convenience, you can save it to the Desktop.
- When the conversion progress is done, you can proceed to Step 2.
Step 2: Import contacts from Windows Live Mail as VCF to Outlook
Now, it is time to import the VCF file with your Live Mail contacts to Outlook.
- Download and install the Live Mail Contacts Converter tool.
- When the installation completes, run the VCF Converter tool from the Start menu.
- The tool itself is very simple. Browse for a folder where you saved your exported VCF file from Windows Live Mail (see Step 1 above).

- Click the Scan Folder button, and the converter will detect all Window Live Mail contacts in that folder.

- Once the scan is complete, click the Save as PST button. This will make the program to save your VCF contacts directly into an easily importable PST file.


Note that importing a VCF file directly is not recommended, because you will have to import one vCard file at a time. Rather, converting the entire folder to a PST file allows you to import your Windows Live Mail contacts to Outlook in just one go saving you a lot of time.
- Now run Outlook. Select File -> Open Outlook Data File menu item.
- After the contacts are imported, you can reorganize them in Outlook as you need, create groups and so on.
The alternative to automatic contacts conversion is manual conversion of Windows Live Mail contacts to Outlook. Here is how.
How to transfer contacts from Windows Live Mail to Outlook (the CSV option)
Exporting contacts from Windows Live Mail to the CSV format is a simple way to have all your contacts imported to Outlook. You don’t need MS Outlook to be installed on the same machine as WLM. The entire process consists of two steps. First, you export contacts from Windows Live Mail to CSV. Then, you import that CSV file to Outlook.
Note that importing a CSV file sometimes results in an error within Outlook. Often this means that you need to manually rename some fields in the CSV file. If you want to avoid any manual operations, please refer to the first section of this article (above) – exporting contacts using the VCF Business Card format.
Step 1: How to export Windows Live Mail contacts (to Outlook)
At first, you will need to export your Windows Live Mail contacts to a CSV file.
- Start the Windows Live Mail application
- In the lower-left panel click the Contacts menu. This will open the contacts tab in the central part of the window. Select what contacts you need to export.
- On the toolbar (ribbon) of WLM select Export.
- Select Comma Separated Values (CSV) as the output format.
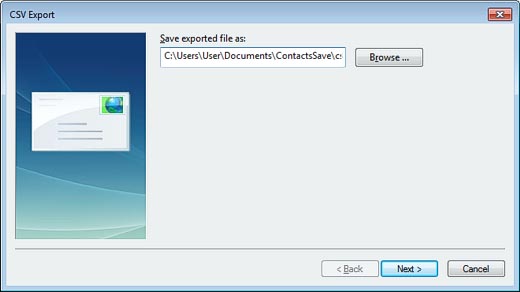
- A CSV exporting dialog is opened. Select the output file where the CSV data about your Windows Live Mail contacts should be written to. Browse for any suitable folder (the Desktop is fine) and specify the filename.

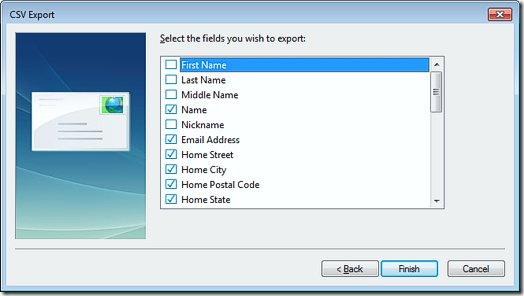
- Now, click Next and select which parts of the contacts database you would like to export to Outlook.

- The progress bar indicates the process of exporting to the chosen CSV file.
- As soon as the export process finishes, you should find the CSV file in the folder you selected at pt.5.
Export contacts from Windows Live Mail to an Outlook compatible CSV file is done!
So, the CSV file is ready to be imported to Outlook. How you can do this?
Step 2: How to import contacts from Windows Live Mail to Outlook as CSV
This step is slightly different depending on which version of Outlook you use. You see, Outlook 2007 and 2010 have a bit different user interface than versions 2013 or 2016, so the steps are somewhat varying. But don’t worry, we’ll explain how to import Windows Live Mail contacts from CSV to any version of Outlook.
Import to Outlook 2013-2016
- Run Outlook 2016 or 2013 on the PC where you want to import contacts from Windows Live Mail. Note that if this PC is different from where WLM is installed, you will need a way to transfer the CSV file to the Outlook machine before transferring contacts.
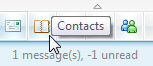
- At the bottom left panel click the Contacts icon (it depicts people). This will bring up the contacts panel.
- Now, click the File menu on the ribbon and select the Import/Export item. This will bring up the import and export dialog of Outlook 2013/2016.
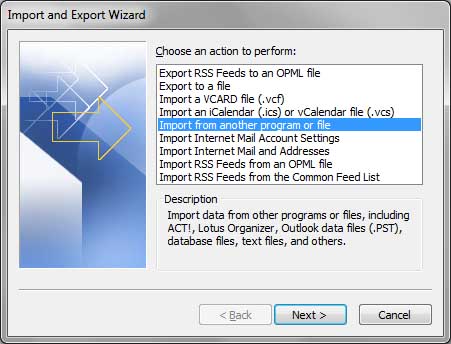
- In the import dialog, select the following option: “Import from another program or file”.
- Click Next.
- Select the format of the source file to import. Outlook support importing from PST files and from CSV files. We need the CSV option now, select it.
- Click Next.
- Outlook will ask you to select the CSV file to import. Select the CSV file with contacts you exported from Windows Live Mail previously.
- Now, there are three options to import contacts:Depending on how old are the contacts from Windows Live Mail compared to contacts in Outlook you should either Replace duplicates with imported contacts, or Allow duplicates to possibly have multiple copies of the same contact, or Do not import duplicates if you are sure all duplicating contacts already exist in Outlook and are up to date.
- Click Next.
- Now, select the Outlook folder to import Windows Live Mail contacts to.
- Wait until the importing procedure finishes.
Congratulations! You have exported contacts from Windows Live Mail to Outlook 2016 or 2013.
Import to Outlook 2007-2010
These are older versions of Outlook, but the process is essentially the same.
- Start Outlook 2010 or 2007. If you have even older version – 2003, 2000 etc. – you may still want to try these steps. Most likely, they will work just fine too.
- At the bottom left panel, click the Contacts button.
- Then, click the File -> Open menu and find the Import item. The importing Wizard opens.

- Select from where you want to import contacts to Outlook: “Import from another program or file”. Another program here is, naturally, Windows Live Mail.
- Click Next.
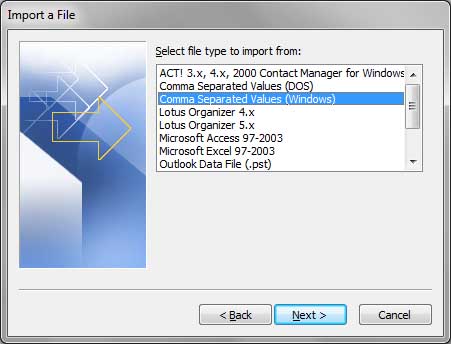
- Select the “Comma separated values (Windows)” importing option. Notice the “Windows” remark – there are some differences between legacy DOS CSV files and Windows CSV files. And Windows Live Mail exports contacts in the latter one.
- Click Next.
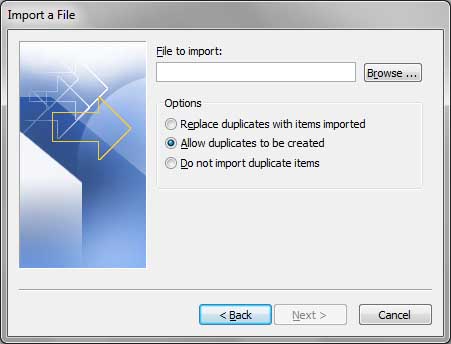
- Now, select the CSV file to import to Outlook. Click the Browse button and select the CSV file with contacts you previously exported from Windows Live Mail.
- On the same tab select the importing option. Specifically, you can transfer contacts from Windows Live Mail to Outlook and Replace duplicating contacts with ones from the CSV file, or Allow duplicates, or simply Do not import duplicates at all.
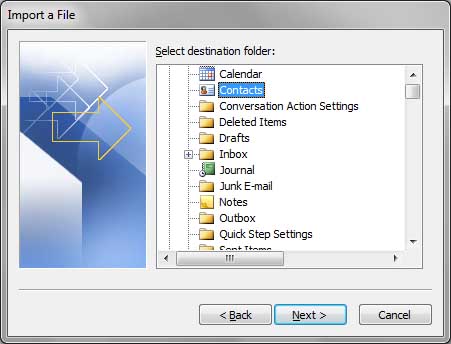
- Now, select the Outlook folder you would like to import contacts from WLM to.
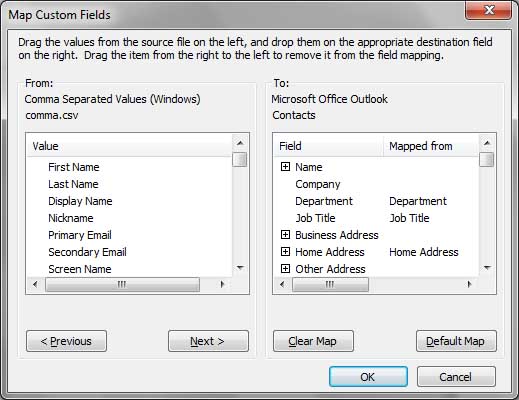
Select folder called Contacts to import your Live Mail contacts and press Next button - Press “Map Custom Fields …” button and correct the relations between contact fields of the Live Mail and Outlook

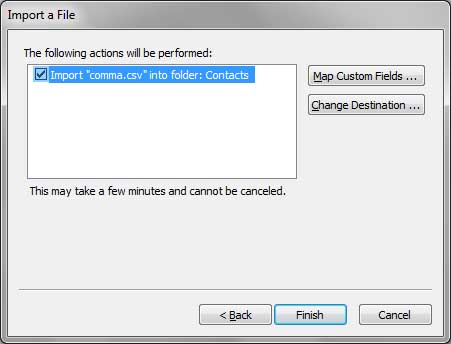
- Press “OK” and then “Finish” button
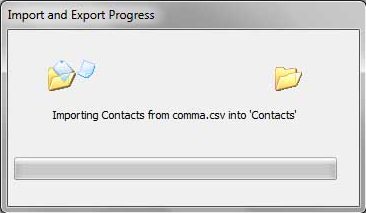
- You will see the progress of the Live Mail contacts migration and all contacts will be imported to the selected Outlook folder

- The process will take some time. After that, you are done.
Congratulations! You have successfully exported to Outlook 2010 contacts from Windows Live Mail.